
Video Analysis Apps
By Doug Eng EdD PhD, USPTA Master Professional, PTR International Master
Professional
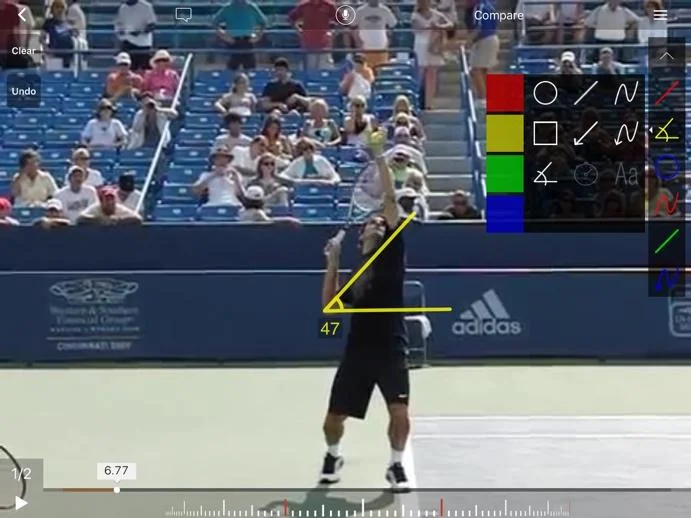
Hudle Technique
Among the most useful technologies that any coach can use is making videos of athletes. It is quite easy to just film students and show them. But if you need to really make a strong point on videos, apps are quite helpful. There are a number of apps that assist analysis of videos. Chances are you downloaded one app (and say, hey, I need to do more videos) or maybe use apps regularly. Today’s apps have lots in common: inexpensive pricing, drawing tools, wheel for moving the video and split screen for side-by-side comparisons. What differentiates
many apps is more a matter of extra features, quality and simplicity. Using video analysis is highly useful since we often miss things in just watching. In addition, your student can more clearly see what to work on. You can often ask your students what they think rather than offering a correction. It becomes a better learning experience if they try to figure out some things. Finally, consider videoing at high speeds or slow motion (e.g, 240 fps). It uses more space on the smartphone but it’s easier to see things that you might miss at 30 fps.
THE BASICS:
There are some essentials every modern video analysis app should have:
- Recording from smartphone or tablet camera
- Downloading videos from other cameras, youtube or other sources
- Drawing/writing tools: straight lines, curved lines, lines with arrows, circles,
- rectangles, choice of colors, text/fonts, angles (with degrees).
- Advanced tools may include timer, dotted lines, curves using paths, etc.
- Wheel or timeline for moving a video forward and backwards in time.
- Split-screen for side-by-side comparison and synching of two vidoes.
- Audio recording for voiceovers
Hudl Technique tools
- Multiple speeds sometimes listed as 1/8, ¼, ½ and 100% speed
- Choice of uploading to smartphone camera, email, youtube, etc
- Inexpensive storage or locker space
SPLIT SCREENS
When comparing two videos, for best results, make sure the speeds are the same. You can still use different speeds but it’s a bit harder to compare since you may need to manually move one video around. You can use the app or other video apps to speed or slow down videos before adding them into split-screen usage. There are four ways of using split-screens: Before and After lesson: Is a common usage of filming. Keep in mind, your student may or may not have a change in technique. So usually do with dead ball feeds after the technical change. If you film during live points afterwards, you may not see a change. The purpose is the create a good image of what the student can do and is trying to achieve. Film a stroke at the start of the lesson before giving any corrective instruction and film midway or near the end of the lesson. In between, work on the stroke for 10-20 minutes. To save time, rather than analyze on site, you can send results to your student after the lesson. But during the lesson, it’s best to have your student quickly view the videos and after the lesson, spend 15 minutes creating the split screen analysis.
Comparison with a model/pro
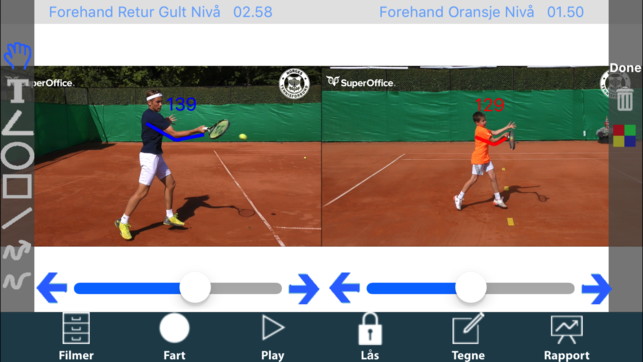
NTF side-by-side comparison with student vs pro (note the bas as the “wheel”)
is perhaps the most common usage. Upload pro videos on the app or at least your camera. When filming, pick student filming angle views that are the same as you have stored for touring pros. It’s helpful to show briefly the split-screen of the pro and student during the lesson before you proceed with the bulk of the lesson. You can film again at the end and make the final split screen with the after-the-lesson video.
Different angle views

Same serve, different angles using two cameras with Hudl Technique.
You should have two smartphones or cameras for this purpose. Film from two angles at the same time and then upload the second camera video on the first. It’s helpful to have two tripods. If you ask your student to use their smartphone, you have two recording devices (with yours). Best angles are for the serve: behind and from the chest side. For the groundstrokes: from the chest side (or unit turn side) and slightly in front from between the service line or to the net
post. For volleys and overheads: from the side and from the other sideline (around
service to baseline).
Over time

Coach’s Eye: comparison of student 6 months later
This is a less used technique and very useful with juniors to show long- term improvement. Film regularly every 3-6 months. You can take a video from 9-12 months ago to compare with the current video. It gives a student a very clear pathway for improvement as students can see their real progress. Sometimes filming\ over the same lesson or within a 2-3 week period doesn’t really amount to too much noticeable improvement. So here’s a rundown of the best apps. All are available from Apple or Google Stores:

PTR Coach/NTF Technique
These two apps are basically the same and still relatively new and unknown. Developed by Oivind Sorvald of NTF with Brian Parkkonen at PTR. The Norwegian (NTF) app came out last year and is a bit cooler to look at. Not all the time you get an app logo and home page in another language. NTF Technique is mostly in English and quite simple, since they wanted to sell the app to others outside Norway. Sorvald also works closely with PTR (on the board of directors) so it wasn’t a major issue for Parkkonen to create a PTR version. The main difference besides language is the in-app videos for coaching red, orange, and green ball youth athletes.

PTR videos are on hard courts as opposed to NTF videos on clay courts.

PTR Coach app showing in-app videos of junior players For moving a video on a timeline, other apps which have a “wheel” with hash or tick marks like a ruler which you slide around. You only see a part of the video timeline so if the video is long, you have to do some extra sliding with the timeline. But in PTR/NTF, there is a simple bar. The bar (with arrows) is an advantage for moving the video from one sport to another very quickly but it’s not easy to precisely line up the videos especially if your video is a bit long. That makes synching two 30 second videos a bit difficult. If you use short videos, like 8 seconds, it’s quite easier with PTR or NTF than other apps. The unique part of PTR/NTF analysis is the comparison for youth tennis athletes. Competency parameters are set for strokes so if you want to compare your student with an ideal orange ball stroke, those images are ready. Given sometimes youth strokes are unrealistically compared with pros, this approach with junior players can be more productive. PTR/NTF apps also allow pdf reports to be generated with frame by frame analysis. You can create player reports with the pdfs. You do not need to be a PTR member to purchase the app. PTR Coach app with player report.

Hudl Technique is free in a basic edition. However, in-app purchases for Hudl Technique can run prices fairly high, the Elite version runs $7.99/month or $49.99 annually. That allows advanced features and locker storage for videos. If you want touring pro videos (including Christina McHale, Tim Smyczek and Denis Kudla) it is a one-time fee of $9.99. But there are easy free ways of importing pro videos into your app or
any app. So if you go with Hudl, I don’t recommend getting the in-app purchases unless you are related to one of the touring pros. Or a fan. Hudl isn’t much different from other apps but it does have a very smooth feature for changing speeds (1/8, ¼, ½ or full speed) of the video. The final video product does seem quite good in quality.

Hudl Technique: before and after lesson

Coach’s Eye is the most popular for ease of use. It can be purchased inexpensively as a complete package. It allows easy access to youtube uploading and GoPro cameras. Because of its simplicity, Coach’s Eye remains the most popular option. Like Hudl and PTR Coach, Coach’s Eye does audio commentary during the video play. One disadvantage of Coach’s Eye seems to be the quality of video when exported. You may lose a fair amount of resolution. In addition, it takes a relatively long time to render a video after editing. The final video product can be mediocre in quality so make sure the original video quality is excellent and also don’t make the video long since that lengthens rendering and loss of video quality. On a personal note, I do use Coach’s Eye the most simply because I have most of my touring pro videos uploaded on the app. So it’s easy for instant side-by-side comparison.

Dartfish Express is the scaled-down version of its more complete laptop version. It differs from the other apps in that you have to take a still photo which is a key position (e.g, unit turn) and do the audio commentary over the still. Other apps do the commentary during the video. Typically, you can move the video forward or backwards and make notes. Dartfish Express doesn’t have that option but counts on creating a series of stills or key positions as points of commentary. It’s more a matter of getting used to Dartfish Express. Dartfish Express is less intuitive than the other apps which probably accounts for its lower popularity. Therefore, there is a learning curve that may take some practice but within a few attempts, you should be good to go. Still it scores with high quality final videos for viewing. The final product often looks sharper than Coach’s Eye.
As a final word, save your videos by uploading to youtube. You may want to protect the privacy of your student by listing videos private or as unlisted. (I covered recognizable faces in this article). But storing them on youtube privately is helpful since never know when you might need to look at the video again in case you misplace your phone or need more space. Have fun filiming!

By Doug Eng
EdD PhD, USPTA Master Professional, PTR International Master
Professional
A big thank you to Doug Eng for contributing to the Tennis Techie blog for the benefit of all forward thinking tennis coaches out there!
.